How to Hide Programs on Control Panel in Windows
There are a lot of times when people have recommended to hide the programs and items from the Control Panel in Windows. It is possible that these people belong to the IT department where they don’t want to allow the employees to access the settings from the control panel. This is one perspective to understand the requirement, but sometimes you download some programs which are so crucial that you don’t want anyone to know about it.
In such situations hiding those program would be a good choice. But the question that arises is how to do it? To know the answer of this question, just follow the guide and check the methods approaching best to hide the programs on Control Panel of your Windows 10. The methods are unquestionably the best approach, but they are not easy to follow as these methods will take a long time to hide the programs from Control Panel.

How to hide programs on Control Panel in Windows
Hiding Programs from Control Panel using Group Policy
- Press Windows key + R key combination.
- Now, the Run program will open.
- Type gpedit.msc and press the Enter button.
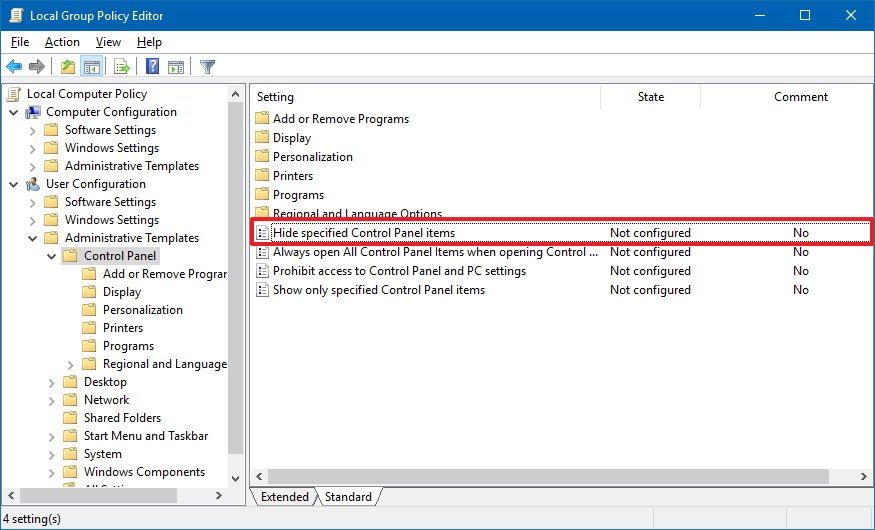
- It will open the Local Group Policy Editor.
- Click to open Configuration and then open Administrative Templates.
- Now go to Control Panel.
- Go to the right pane of the window, and double-click on Hide specified Control Panel items policy.
- Check the Enabled option.
- Click the Show tab in the Options section.
- Type the name of a program which you don’t want to include in Control Panel.
- Click Ok and proceed to click Apply.
- Now finally click OK to save the changes.
Hiding Programs from Control Panel using Registry
- Press Windows key + R key sequences.
- When the Run program opens, type regedit and hit Enter button.
- Navigate to HKEY_CURRENT_USER and click to open Software.
- Find the Microsoft folder and proceed to open Windows.
- Now, click to expand the CurrentVersion folder and further move to Policies.
- Finally, expand Explorer and move in the right pane of the window.
- Right-click to open a menu and select New from the list.
- Click on DWORD (32-bit) Value and name the key DisallowCPL.
- Press the Enter button and double-click on the newly created DWORD.
- Set the value from 0 to 1 and move to the left pane of the window.
- Right click on Explorer folder and select New from the menu.
- Click on Key and now name it DisallowCPL.
- Press the Enter button.
- Open the DisallowCPL folder and move to the right pane.
- Again, right click and select New from the menu.
- Click the String Value and give it the same name of the setting you are hiding.
- Now press the Enter button and double-click the String.
- Now, type the name of the item you want to hide.
- Click Ok.
- Once done follow the last six steps.
While performing the task to hide the items and programs from the control panel, you will need to know the exact name of that program or else the whole procedure will be useless. But once you carefully do everything, you will be seeing the modifications done in the Control Panel.
Jeniffer Leio is a Microsoft Office expert and has been working in the technical industry since 2002. As a technical expert, She written technical blogs, manuals, white papers, and reviews for many websites such as office.com/setup

Comments
Post a Comment